|
|
||||||||||||||||||||||||||||||||||||||||||||||||||||||||||||||||||||||||||||||
Section 1 |
Types of Emulation
|
SheepShaver (MacOS Runtime Environment)
| Section 2 |
SheepShaver, continued |
| Section 3 |
Emulators
|
Game Emulators Chapter Summary In This Section:SheepShaver (MacOS Runtime Environment)
When you use a computer, you don't think about the hardware you're running--you're immersed in a visual environment governed by the operating system and its applications. Whether you're deep in the dungeons of Doom or typing away in a BeatWare Writer document, your hardware fades into invisibility as the interface takes over. But the environment suggested by the operating system is never absolute--just because most of your apps conform to the general appearances and behaviors of the BeOS universe, that doesn't mean that all of them have to. When you're playing a full-screen game, for example, the game emulates another world within the context of BeOS. But why stop with spaceports and mystical worlds? Why not emulate entire operating systems running on other types of hardware? BeOS emulators exist to let you run a copy of the AmigaOS or the MacOS inside a BeOS window, play Nintendo cartridge games in system RAM, or pretend that you're sitting at the helm of an ancient Sinclair Spectrum. While some people experiment with emulators out of curiosity rather than necessity, a well-implemented emulator can save you from having to reboot by enabling you to accomplish tasks that normally can only be done in another system. This chapter offers only a brief overview of the emulators available for BeOS as of R4.0. Some of the emulators covered here (like SheepShaver, the MacOS emulator, which isn't truly an emulator at all) can be genuinely useful, while others (like BeBeeb, the Acorn Micro emulator) are probably around only for nostalgia's sake.
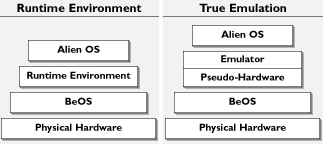
Types of EmulationBefore we dig in, it's important to distinguish between true emulation, where the emulating software actually mimics another platform's hardware, and "runtime environments," where the original hardware is not emulated and a sort of "negotiating layer" is used instead. What's the distinction? As seen in Figure 1, when the alien OS cannot use the machine's physical hardware, an emulator must fool it into thinking that the hardware it wants is actually present. But it's not enough to just emulate a physical hardware environment in software. If you want access to your disk drives, and want your monitor and keyboard to work, the emulator has to communicate hardware calls back to the host OS, which in turn sends them to the physical hardware. Understandably, this process consumes a lot of resources, which usually makes true emulation cumbersome and slow. In fact, it's theoretically impossible for a system to run in emulation as quickly as it does on its native hardware (however, older operating systems are often emulated on current hardware, making it possible to more than compensate for performance penalties).
On the other hand, if both operating systems expect to find the same physical hardware in the machine, there will be no reason to emulate the hardware.
All that's required then is the presence of a software layer that knows how to manage traffic between the alien OS and the host OS. This layer is called a "runtime environment," and its job is only to negotiate communications, not to emulate hardware. As a result, runtime environments are faster than true emulators. A runtime environment is also sometimes referred to as a "virtual machine." To take an example, consider the Un*x Amiga Emulator (UAE), which lets you run AmigaOS within BeOS, regardless of whether you own a Mac or an x86 machine. Because the Amiga's hardware is different from both the Mac and the x86, AmigaOS needs to have that hardware emulated; thus UAE is a true emulator. On the other hand, consider SheepShaver, which lets you boot and run MacOS in a BeOS window. Because both MacOS and BeOS know how to communicate with PowerPC hardware, hardware emulation is not necessary. Instead, MacOS can be made content to run inside of BeOS by providing it with a negotiating layer that knows how to turn MacOS system calls into BeOS system calls, so that you can, for example, copy and paste data back and forth from one operating system to the other. This is an example of a runtime environment, not a true emulator. It also explains why SheepShaver can run MacOS inside BeOS just about as fast as it would run natively. SheepShaver (MacOS Runtime Environment)
|
|||||||||||||||||||||||||||||||||||||||||||||||
| Figure 2 SheepShaver running the MacOS within a BeOS window; Microsoft Word 6.0.1, Photoshop 5.0, and QuarkXPress 4.0 are all active. |
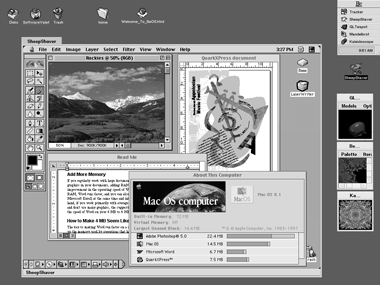 |
SheepShaver's creators, Christian Bauer and Marc Hellwig, claim that in theory any application that will run under the MacOS should run under SheepShaver as well. In practice, it's not that simple. As Figure 2 shows, I was able to get a number of popular applications, including Word 6.0.1, Photoshop 5.0, and QuarkXPress 4.0, to run successfully under SheepShaver. I also succeeded in printing and in transferring files to and from another Mac with MacOS file sharing. That's the good news. The bad news is that it took several hours of tweaking to get everything to work (see Known Problems and Troubleshooting, below). And I never did get my modem to work properly. Be forewarned that software that accesses the Mac's hardware directly--many games fall into this category--is likely to cause problems.
System Requirements
SheepShaver 1.1 (the current version at the time of this writing) will run on any MacOS system that supports BeOS. This includes multiprocessor systems, although the MacOS applications that run within SheepShaver can't take advantage of the multiple processors.
SheepShaver supports versions 7.5.2 through 8.1 of the MacOS. Support for MacOS 8.5 is in the works. On the BeOS side, SheepShaver requires BeOS for PowerPC R3. (SheepShaver 2.0, when it becomes available, will require BeOS for PowerPC 4.0.)
To install SheepShaver, you will need 300K of free hard disk space on your BFS volume. To run SheepShaver, you will need a minimum of 16MB of physical RAM. Of course, you'll also have to have at least one MacOS partition available that contains a bootable version of the MacOS.
Acquiring SheepShaver
SheepShaver is available only as a download from BeDepot. Both a trial version and a fully functional shareware version ($50) are available. In the trial version, full-screen mode is disabled and an annoying message pops up on your screen every couple of minutes reminding you that you haven't paid yet. When you pay the shareware fee, you will receive by email a "key" file that enables full-screen mode and disables the warning messages. If you plan to use SheepShaver regularly, pay the shareware fee. You get way better performance in full-screen mode--not to mention the karmic benefits.
Installing SheepShaver
SheepShaver installation is simple: SoftwareValet does all the work for you. When you double-click the SheepShaver Trial.pkg icon, the BeOS will launch SoftwareValet. If this is the first time you've used SoftwareValet, it will present you with several configuration options (see Chapter 10, System Tools and Utilities for more on SoftwareValet). Once you get past this initial screen, you'll be given the opportunity to install SheepShaver.
By default, SheepShaver will be installed in the apps folder of your BeOS boot drive. Unless you have a good reason to change this location, stick with the default. SoftwareValet will also give you a choice between Standard and Minimal installs, but actually it doesn't make any difference which one you choose. If you've configured SoftwareValet to display installation previews, when you click the Begin button, a Preview Install window will open, showing you where SheepShaver's various files will be installed. Again, unless you know what you're doing and have a good reason for doing it, stick with the defaults.
When the installation finishes, a SheepShaver registration window will appear. See Chapter 10, System Tools and Utilities, for more information on registering software with SoftwareValet.
Launching SheepShaver
Performing a few setup tasks before launching SheepShaver for the first time will make things go more smoothly.
- Make sure that virtual memory is turned off in the MacOS Memory control panel. Don't worry, you don't need it anyway. SheepShaver uses BeOS's virtual memory system, which is superior to the Mac's.
- Disable all Mac extensions that you don't really need. SheepShaver is prone to extension conflicts. The fact that an extension works when you run the MacOS directly doesn't guarantee that that same extension will work under SheepShaver. The following extensions are known to cause problems: RAM Doubler, Speed Doubler, MacOS Licensing Extension, and 68K FPU emulator extensions (such as PowerFPU); but this is by no means a comprehensive list.
- Once you get SheepShaver working, you can start reenabling your favorite extensions. An extension-management utility like Conflict Catcher or Now Startup Manager is helpful for this task; the MacOS's built-in Extensions Manager will work, too, but it lacks some useful bells and whistles.
- If you intend to use AppleTalk network services from within SheepShaver, make sure that you have set up an Ethernet interface in the BeOS Network preferences panel (see Chapter 9, Networking, for details). Of course, if your Mac doesn't have Ethernet, you can't very well set up an Ethernet interface for it in BeOS. See Network Settings, below, for what to do in this case. LocalTalk networking is not supported.
- In BeOS, mount any Mac volumes that you will want access to from within SheepShaver. This includes removable cartridges.
Launch SheepShaver as you would any other BeOS application, by double-clicking its icon. Before the MacOS environment appears, SheepShaver displays a SheepShaver Settings panel, in which you can configure various aspects of the program's behavior. Details about these settings are described below in SheepShaver Settings.
| The first time you launch SheepShaver, it will boot the MacOS from the first boot volume it finds, regardless of which volume is designated as the startup disk in the MacOS's Startup Disk control panel. If you want SheepShaver to boot from a specific MacOS volume, you must select that volume in the Startup Disk control panel from within SheepShaver. |
| Figure 3 SheepShaver warns you before attempting to mount HFS volumes that are already mounted in BeOS. |
|
 |
|
| Figure 4 The first time you run SheepShaver, it will ask you if you want to modify the BeOS network configuration to support Ethernet under SheepShaver. |
|
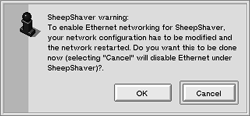 |
The first time you run SheepShaver, a warning will appear asking you whether you want your network configuration modified to support Ethernet under SheepShaver.
If you click the OK button, SheepShaver will automatically make the modification; if you click the Cancel button, SheepShaver will disable Ethernet.
SheepShaver Settings
The SheepShaver Settings panel appears each time you launch SheepShaver. You'll probably configure most of these settings once and then leave them alone. In fact, many of them can simply be left at their default values. Before you can use SheepShaver, though, you'll have to visit the Volumes tab page. You'll probably want to tweak the settings on the Memory tab page as well.
Volumes Settings The Volumes tab lets you select which MacOS volumes you want to appear on the Mac Desktop in SheepShaver. Both HFS and HFS+ volumes are supported, as are removable volumes (Zip and Jaz cartridges, for example). Note, however, that you have to mount all volumes--including removables--before you launch SheepShaver. You can't mount a removable cartridge from within SheepShaver. This should be fixed in version 2.0.
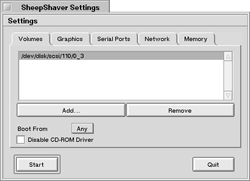
Selecting Mac Volumes to Mount in SheepShaver When you first launch SheepShaver, the Settings panel will open with the Volumes tab page displayed. Its list of volumes will be empty. To add a volume to the list, click the Add... button. A BeOS File panel will appear, from which you can select a volume. Repeat this process for each volume that you want SheepShaver to mount. Note that before you can mount a volume in SheepShaver, you must first mount it in BeOS; Option+click on the BeOS Desktop and choose Mount from the context menu.
Figure 5
From the Volumes tab page in SheepShaver's Settings panel, you can select HFS and HFS+ volumes to be mounted on the Mac Desktop in SheepShaver.
Once you've added a volume to SheepShaver's list, go back and unmount it from the BeOS Desktop before you launch SheepShaver. It's a pain, but less of a pain than the alternative. As part of its startup process, SheepShaver tries automatically to unmount from BeOS any volumes that you've selected to appear in the MacOS. But this automatic process doesn't always succeed. If it fails, chances are good that your Mac will hang. If this occurs, the only way out is a manual restart.
| While SheepShaver is running with HFS or HFS+ volumes mounted in its environment, do not attempt to mount those same volumes in BeOS. Doing so can cause disk corruption and unrecoverable data loss. Never click the "Mount all disks now" button in the Disk Mount Settings panel while SheepShaver is running! |
To remove a volume from the SheepShaver volumes list, select the volume (you'll have to know its SCSI ID--the list doesn't display volume names), then click the Remove button.
Selecting a SheepShaver Boot Volume The Boot From pop-up menu on this tab page lets you select a MacOS boot volume. When Any (the default value) is selected, SheepShaver will boot from the first boot volume it finds. When CD-ROM is selected, SheepShaver will attempt to boot from the disk in the CD-ROM drive.
Disabling SheepShaver's CD-ROM Driver SheepShaver includes a CD-ROM driver that should work for all CD-ROMs that shipped with MacOS systems supported by the BeOS. The SheepShaver CD-ROM driver supercedes whatever CD-ROM driver is installed in your MacOS System Folder (typically Apple CD-ROM or CD-ROM Toolkit). The Disable CD-ROM Driver checkbox on the Volumes tab page gives you a way to disable SheepShaver's CD-ROM driver. But since there's no other CD-ROM driver that works with SheepShaver, checking this box will disable your CD-ROM drive.
| In most cases, you'll have no need to disable the CD-ROM driver. An exception: Disabling the driver will enable you to play audio CDs in BeOS while working in SheepShaver. |
Graphics Settings SheepShaver provides two display modes: window and full-screen (see Display Modes, below, for more details). The Graphics settings tab page allows you to control the refresh rate of the SheepShaver window when SheepShaver is in window mode. It also allows you to turn off graphics acceleration. Other graphics-display settings, such as screen resolution, must be set from within SheepShaver itself.
Figure 6
The SheepShaver Graphics Settings tab page provides partial control over how the MacOS environment is displayed.
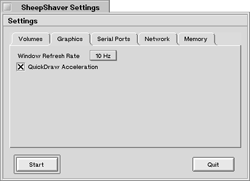
Setting SheepShaver's Window Refresh Rate SheepShaver runs much more efficiently in full-screen mode. Performance and responsiveness are both far better in full-screen mode than in window mode. If, however, you decide to use it in window mode (and you have no choice if you haven't paid the shareware fee), you can change SheepShaver's refresh rate from the Window Refresh Rate pop-up menu on the Graphics Settings tab page. But there's not much point. Although it's counterintuitive, higher refresh rates make SheepShaver behave more slowly, because it's spending its time drawing the contents of the SheepShaver window instead of running the MacOS. So stick with the default rate (which is around 5 or 6 Hz). Note that this refresh rate refers only to how frequently the MacOS environment inside the SheepShaver window is redrawn. Everything else in BeOS will continue to be refreshed at the rate set in the Screen preferences panel, which will probably be in the 65-75 Hz range.
Disabling QuickDraw Acceleration SheepShaver can take advantage of most of the BeOS graphics drivers for graphics cards supported by BeOS for PowerPC. These drivers provide QuickDraw acceleration. Accordingly, the QuickDraw Acceleration checkbox on the Graphics Settings tab page is selected by default. There's not likely to be any reason why you'd want to turn off QuickDraw acceleration, since it speeds up graphics display, but if you suspect that the driver for your graphics card may be causing a problem, you might want to try deselecting this option.
Figure 7
Users running SheepShaver on a Mac have no need to alter these serial port settings.
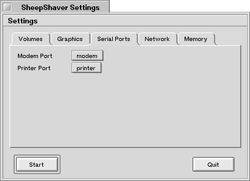
Serial Ports Settings These settings are here for people running SheepShaver on a BeBox. If you're running it on a MacOS system, you shouldn't need to change anything on this tab page.
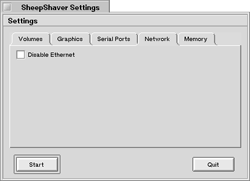
Network Settings The Network Settings tab page presents you with the option to disable Ethernet. By default, this checkbox is unselected; that is, Ethernet is enabled. In most cases, you'll want to leave it that way. If, however, your Mac has no Ethernet capability, you'll probably want to select the Disable Ethernet option. Otherwise, every time you start up SheepShaver, you'll get a warning that there's a problem with your Ethernet connection. You'd think that software that's clever enough to allow one operating system to pretend to be another one would also be clever enough to figure out that a particular machine has no Ethernet interface, but apparently that's not the case.
Figure 8
If your Mac has no Ethernet interface, select this checkbox. Otherwise, leave it unselected.
Memory Settings
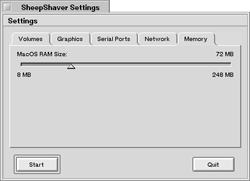
SheepShaver's Memory Settings tab page is where you establish how much memory will be available to the SheepShaver MacOS environment. Setting this memory allocation is simple: You just move a slider. Understanding what's going on, however, is a bit trickier.
Figure 9
The SheepShaver Memory Settings tab page lets you establish the amount of memory that will be available in the SheepShaver Mac OS environment.
BeOS has a fully functional demand-paged virtual memory (VM) system that is always enabled (see Chapter 9, Preferences, for details). It is part of the core OS. The MacOS, in contrast, has a suboptimal virtual memory system that is bolted onto the OS. The two VMs don't get along well. Hence the warning in the Launching SheepShaver section, above, to turn off the MacOS's virtual memory system before running SheepShaver. Although Apple generally recommends that you turn virtual memory on in the MacOS, you'll have nothing but trouble (and, in fact, you probably won't be able to launch SheepShaver without crashing) if you don't turn it off.
One of the advantages to Mac users of the MacOS's virtual memory is that when it is turned on, it enables applications to run in less memory than when it is turned off. You've probably noticed the messages in the Get Info windows of Mac applications that, when virtual memory is on, tell you how much more memory will be needed by the application if you turn virtual memory off. So when setting the RAM size for SheepShaver, remember that if you want to run several Mac applications at once, and you normally run the MacOS with virtual memory on, you're going to need more memory than you're used to needing for those apps. Fortunately, BeOS's virtual memory system is quite up to the task.
The minimum RAM size that you can set for SheepShaver is 8MB. You'll probably want significantly more, though. You wouldn't try to run a Mac with only 8MB of RAM (and virtual memory off, remember)--especially not if you wanted to use any Microsoft applications--so it doesn't make sense to run SheepShaver that way, either.
The maximum amount of memory you can allocate for SheepShaver depends on how you have BeOS virtual memory set up in the Virtual Memory preferences panel. When you run BeOS, it creates a swap file. The swap file's minimum size depends on how much physical RAM is installed in your computer, but it will be at least 48MB. If there is room available on your BeOS hard disk, you can set the swap file size to be much larger.
What shows up on the SheepShaver Memory Settings tab page as the maximum amount of RAM available for SheepShaver is equal to the size of your BeOS swap file minus 8MB. In the Figure 09, for example, the BeOS swap file is 256MB, so the maximum RAM that can be allocated to SheepShaver is 248MB.
|
|
next >> |
 |
 |
Please direct technical questions about this site to webmaster@peachpit.com.
Copyright © 1999 Peachpit Press and the respective authors.

