|
|
||||||||||||||||||||||||||||||||||||||||||||||||||||||

| Section 1 |
Types of Emulation
|
SheepShaver (MacOS Runtime Environment) Section 2 |
SheepShaver, continued |
| Section 3 |
Emulators
|
Game Emulators Chapter Summary
In This Section:SheepShaver (MacOS Runtime Environment), continued |
|||||||||||||||||||||||
| Although the MacOS supports multiple monitors, SheepShaver doesn't. Having more than one monitor connected to your Mac when you run SheepShaver is not a problem, but only the monitor that contains the menu bar will be active. |
Setting SheepShaver's Resolution and Refresh Rate SheepShaver supports six standard Mac screen resolutions, ranging from 640x480 to 1600x1200 pixels. At 640x480 and 800x600, both window mode and full-screen mode are available. At higher resolutions, only full-screen mode is available. In window mode, SheepShaver gives you a choice of several different refresh rates. In full-screen mode, the actual refresh rate is determined by the resolution of the workspace in which SheepShaver is running, which is set in the Screen preferences panel.
The first time you launch SheepShaver, it will come up in window mode with a resolution of 640x480 and a refresh rate of 5 Hz. Once SheepShaver is running, you can change resolutions from the resolution pop-up in the control strip or from the Monitors & Sound (or Monitors) control panel.
| Figure 10 You can set SheepShaver's screen resolution and refresh rate from the Mac's control strip or from the Monitors & Sound control panel. |
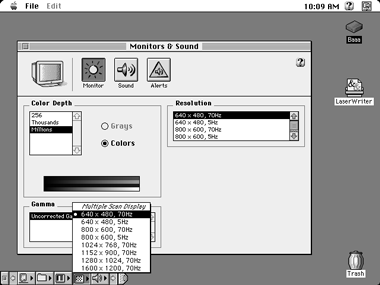 |
(See Window Mode, below, for information on changing the window-mode refresh rate.) Selecting any resolution that has an accompanying refresh rate of 70 Hz will put SheepShaver into full-screen mode. Selecting a resolution with a refresh rate of 5 Hz will change SheepShaver's resolution but will leave it in window mode. Once in full-screen mode, you can change to window mode by selecting a screen resolution that is paired with a lower-than-70-Hz refresh rate.
Full-Screen Mode In full-screen mode, the SheepShaver MacOS environment takes over an entire BeOS workspace (whichever one is active when you launch SheepShaver). When you're in that workspace, it's as if you were running the MacOS directly. BeOS is nowhere
Figure 11
When SheepShaver is in full-screen mode, it takes over an entire BeOS workspace.

in evidence.
This, of course, raises the question of how one gets "back to BeOS" from SheepShaver. The answer is built into BeOS, which allows you to use keystroke combinations to move among workspaces. Each workspace has an internal numeric designation. The workspaces are numbered from left to right and top to bottom. Thus, in Figure 11, SheepShaver occupies workspace #1, and reading left to right in the top column, the next workspace is workspace #2; the next, workspace #3 with the Be logo window in it. In this example, if you were in SheepShaver, you could get to workspace #2 by pressing Command+F2, to workspace #3 by pressing Command+F3, and so on. Command+F1 would bring you back to SheepShaver from any other workspace.
Alternately, you can return to BeOS by changing SheepShaver's resolution. If you select 640x480 or 800x600 with a 5 Hz refresh rate, SheepShaver will revert to window mode. You can change the refresh rate either from the Monitors & Sound control panel or from the resolution pop-up in the Control Strip.
Window Mode In window mode, the SheepShaver MacOS environment is contained within a BeOS window, as shown in Figure 2. In most respects, SheepShaver behaves the same in window mode as it does in full-screen mode. Performance is not as good, however.
Figure 12
In window mode, you can set SheepShaver's refresh rate from the SheepShaver pop-up menu at the lower-left corner of the SheepShaver window.

Window mode provides several different screen refresh rates, ranging from 5 Hz to 60 Hz. The window-mode refresh rate can be set either in the SheepShaver Settings panel that appears when you launch SheepShaver or from within SheepShaver itself. Setting the refresh rate from the Settings panel is described above, in Setting SheepShaver's Window Refresh Rate. To set the refresh rate from within SheepShaver, click on the word "SheepShaver" in the lower-left corner of the SheepShaver window. From the menu that appears, select Refresh Rate; then select the desired rate from the secondary menu.
Although it might seem that higher refresh rates would result in improved responsiveness, in my experience, that wasn't the case. If you're going to run SheepShaver in window mode, you're probably best off leaving the refresh rate at the default of 5 Hz.
Using SheepShaver to Transfer Data and Files
The built-in FTP capability in BeOS provides a means of transferring files between BeOS and MacOS systems over Ethernet (see Chapter 9, Networking). SheepShaver opens up additional possibilities: cut, copy, and paste (for text); and Mac file sharing, for moving files from the SheepShaver MacOS environment directly to another Mac, without going through BeOS.
Cut, Copy, and Paste SheepShaver shares a clipboard with BeOS, but only for text. Other types of data are not supported. If, however, all you need to do is move some text from a SimpleText document to a StyledEdit document, or vice versa, it's a simple matter of cutting and pasting. Note that only ASCII text will be copied--typeface, style, point size, and other types of formatting information are not preserved.
File Sharing If you've used Mac file sharing before, you already know how to use it in SheepShaver. Working in SheepShaver is just like working directly on a Mac. As with a Mac, file sharing can go both ways. You can use the AppleShare client from the Chooser to log onto another Mac, or you can turn file sharing on in SheepShaver to allow other Macs to share your files.
| Mac file sharing is a great solution if what you want to do is move Mac files from SheepShaver to another Mac. Unfortunately, moving files from SheepShaver to BeOS is more of a hassle. Because you can't have the same volume mounted in SheepShaver and BeOS at the same time, to move a file from a Mac volume mounted in SheepShaver to a BeOS volume, you have to quit SheepShaver, mount the Mac volume in BeOS, and then copy the file. Then you have to remember to unmount the Mac volume in BeOS before relaunching SheepShaver. This will be fixed in 2.0: SheepShaver will provide a BeOS icon on the Mac Desktop, making file transfer a much simpler proposition. |
Like Russian Dolls...Soon after the release of SheepShaver, the satirical pseudo-news site BeDope ran a contest to see just how many emulated or runtime environments could be hosted within one another. The winner of the contest would be the person who could create the deepest "hall of mirrors"--an OS within an OS within an OS, nested one inside the next like Russian dolls. To kick things off, BeDope ran a screenshot of BeOS running MacOS in a window via SheepShaver. In turn, MacOS was running a Windows 3.1 emulator, which in turn was running an Apple IIe emulator (which, by the way, was playing a game of DigDug). Since the game itself didn't count, that was four. Who could do five? The prize offered was a Be T-shirt. Anyone who could stack up six nested systems would take home a Be polo shirt, "proven to make you look ten pounds lighter, ward off mosquitoes, code faster, and attract groupies in droves. Your mileage may vary." To this day, nobody has stepped forward to claim that prize (the contest is still open!), but Be's own Mikol Ryon did manage to get five nested systems going at once. |
Figure 13 Emulators within emulators, nested like Russian dolls. Pictured: BeOS hosting MacOS, hosting Windows 3.1, hosting DOS, hosting a Mac Plus emulator, hosting CP/M (which is an antique precursor to DOS). |
|
|

Floppy Disks According to SheepShaver's documentation, floppy disks are supported in the SheepShaver Mac OS environment. They do not, however, mount automatically when inserted into the Mac's floppy drive. To mount a floppy manually while in window mode, insert the disk, then select Mount Floppy from the SheepShaver menu in the lower-left corner of the SheepShaver window. To mount a floppy while in full-screen mode, insert the floppy, then press Ctrl+F1.
That's the theory. I was unable to get it to work in either mode. Other SheepShaver users have reported that floppy mounting works fine for them. If you're one of the unlucky ones, have faith: The problem should be resolved in SheepShaver 2.0.
Quitting SheepShaver
Unlike most BeOS applications, SheepShaver has no Quit menu item. In fact, SheepShaver has no BeOS menu at all. But it does have Mac menus. To quit SheepShaver, select Shut Down from the Mac's Special menu.
And, in case you're curious, selecting Restart from the Mac's Special menu while in SheepShaver will restart the SheepShaver MacOS environment, leaving the rest of BeOS as it was.
| The SheepShaver MacOS environment is active only when SheepShaver's window (or workspace) is active. If you click outside the SheepShaver window (or, if SheepShaver is in full-screen mode, switch to a different workspace), all activity in the MacOS environment halts. When you reactivate SheepShaver, it resumes where it left off. |
Known Problems
The following list of known incompatibilities and bugs in SheepShaver 1.1 (as noted in the SheepShaver documentation) is up to date as of press time. For the latest information, check out the SheepShaver Web site.
- MacOS programs that access hardware directly are not supported.
- RAM Doubler, Speed Doubler, and 68K emulators such as PowerFPU are not supported.
- The QuickTime 2.5 Cinepak codec causes SheepShaver to crash.
- Sound doesn't work on Tanzania-based systems.
- Random crashes have been reported on some systems when using the serial ports.
Troubleshooting
SheepShaver can be very finicky. Your best bet is to start clean and be conservative. Don't assume that you're going to be able to use your existing MacOS system software setup without a hitch. More likely, you're going to have to create a custom System Folder for SheepShaver use.
When SheepShaver crashes, it's not pretty. In my experience, a SheepShaver crash usually brings down BeOS with it. (I know, BeOS memory protection is supposed to prevent such events from happening--but they happen anyway.) To get back to where you were in SheepShaver, you have to reboot three OSs: the MacOS, BeOS, and the SheepShaver MacOS environment. So you really want to do all you can to avoid this unpleasantness. You'll find an extension-management tool like Conflict Catcher or Now Startup Manager invaluable if you're having problems.
Here are some troubleshooting tactics you can try (in addition to the recommendations made in Launching SheepShaver, above):
- Use a different version of the MacOS. I tried 8.1, 7.6.1, and 7.6, all of which crashed repeatedly. I finally settled on 7.5.5 (the OS version that shipped with my Umax clone), which is pretty reliable. This isn't to say that you'll necessarily need to downgrade to 7.5.5; just that you may need to experiment with an older version of the MacOS to create a stable environment.
- Do a clean install of the OS. The first time you run SheepShaver, hold down the Shift key after you get past the SheepShaver Settings panel to disable all MacOS extensions. Once you've succeeded in getting to the Mac Desktop, add your favorite extensions--one at a time if you're timid; all at once if you're the adventurous type.
- Reinstall SheepShaver. When you get a message asking if you want to replace existing files, say yes. I found that reinstalling SheepShaver once usually didn't do the trick; two times generally seemed to work, though.
- Delete the /boot/home/config/settings/NVRAM file.
- If you're having a networking problem, make sure that Ethernet is configured in the BeOS Network preferences panel. Also, try disabling AppleTalk in the Network preferences panel.
- If you're using TCP/IP from within SheepShaver, make sure you have different TCP/IP addresses set for the MacOS and BeOS.
| << previous |
|
next >> |
 |
Please direct technical questions about this site to webmaster@peachpit.com.
Copyright © 1999 Peachpit Press and the respective authors.