|
|
||||||||||||||||||||||||||||||||||||||||||||||||
Excerpt: Audio ApplicationsAfter all this talk about the many ways in which BeOS is optimized for handling high-bandwidth audio and video streams, you might expect this chapter to form the heart of this book. In a sense, it does. The tools covered here are among the most exciting BeOS applications available, and they excel at what they do in comparison to similar tools on other platforms. But there's a caveat. Be has put an incredible amount of energy into creating a superior architecture on which developers can create next-generation A/V applications. But the cornerstone of that architecture, the Media Kit, was finalized only with the advent of R4. As a result, at the time this book was written, developers had been presented with the new Media Kit, but had not yet had much time to actually work with it. The field of high-powered A/V applications is going to spread and mature far beyond the list of applications you see here. Consider this an introduction to the field, but don't forget to check BeWare and BeDepot for further offerings.
Audio ApplicationsBeOS lets applications talk to audio hardware with exceptionally low lag times, or "latencies." An audio signal can be sent from an application, through the audio subsystem, and to the sound card in 6 milliseconds or less, whereas the exact same sound card in the exact same system can incur latencies of 25 to 30ms under Windows. In laboratory tests, Be has brought audio latency down to 2ms in some cases, so we may enjoy even tighter audio responsiveness in post-R4 versions of the system. Because of this fact, and because of the performance advantages that arise naturally from pervasive multithreading, it doesn't take much to get vendors excited about developing audio applications for BeOS. Indeed, BeOS audio applications began to appear long before BeOS video applications. With the arrival of the Media Kit and the conveniences it offers developers, expect this field to grow considerably well into the future. Adamation's AudioElementsIf you've already read the section on Adamation's ImageElements in Chapter 13, Graphics Applications, you've got a leg up on understanding how AudioElements works, since the working concept is identical. Rather than using a standard audio-editing interface featuring graphical waveforms, knobs, buttons, and channel sliders, AudioElements breaks the process of manipulating audio signals into "elements," each of which represents a very specific operation. Much as one would build a custom command-line tool by "gluing together" individual components, these elements can be arranged in a workspace and wired up into a "network." Let's say you want to take the signal coming from your sound card's input jack, run it through a high-pass filter, sample and hold for two seconds, and run the result through a digital delay. Just drag these four elements from the Elements palette, connect the output of each element to the input of the next, and double-click any elements that require customization. Save the result as a network and you'll be able to apply the same series of controls to any incoming sound at any point in the future. Getting Started The best way to familiarize yourself with AudioElements is to study a few of the many prebuilt networks bundled with the product. As with ImageElements, just press the Play button at the top of any network window to set it in motion. Note that many elements don't depend on either incoming signal or a preexisting audio file for source input--a wide array of sound synthesis modules are offered as elements as well. For example, open the network called "Interesting," and you'll notice that source signal originates from a pair of sine-wave generators. Because overlapping sine waves with differing wavelengths will always enter phase relationships that create additional, synergetic waveforms, a wonderfully haunting "wah-wah" effect is created. Click any of the six small buttons on one of the Sine generators while the network is playing to choose among square, sawtooth, constant, and triangular waveforms.
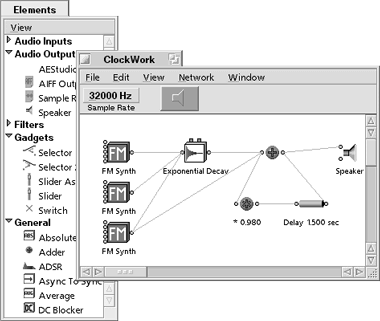
After stopping the network, double-click a wave generator to access a panel from which you can tweak the wave's frequency, amplitude, and phase. Since a single wave generator is infinitely customizable, you can imagine how far you can go by creating networks consisting of multiple generators, file inputs, filters, and other gadgets. The process is like building a custom synthesizer from electronic parts lying around the garage. Synthesis You'll find a wide array of tone-generation possibilities in the FM Synthesis element, which lets you construct sounds by establishing frequency modulation parameters. To get a handle on FM Synthesis, launch the bundled "Clockworks" network, then double-click the FM element, drag some sliders around, and try playing the network again. You can make dramatic changes with very slight parametric variations. To create a "fatter" sound, right-click the FM element and choose Duplicate from the context menu. Change the parameters of the second FM Synthesis element, then connect its output to the input of the Exponential Decay element, which lets you describe the tone's decay (or "tapering") mathematically (see Figure 14.01).
Many of the sample networks shipping with AudioElements use various tone-generation elements to demonstrate effects because of their sonic purity. Try disconnecting the source-generation element in an existing network and replacing it with a File Input element. Then just drag any .wav or .aiff file out of the Tracker and onto the File Input to see how that network affects an actual sound file, as opposed to pure tone. Do the Math Another aspect of the "Clockworks" network with fascinating possibilities is the relationship between its Multiplier and Delay elements. Because these two are additively coupled before being fed to the speaker (see Figure 14.01), they function together as a single element, though their parameters are independently customizable. For example, change the 1.5 second delay parameter to 2.5 seconds, and your church bells will peal much more slowly. The .98 multiplier causes the church bells to slowly fade into nothingness; change this parameter to 1.0, and the bells will ring evenly into infinity, never fading. Dial it up to 1.1, and the bells will slowly grow louder. Most elements in the palette can be combined to work together in this way, just by using the Adder element and grouping other elements together as a subelement of the Adder.
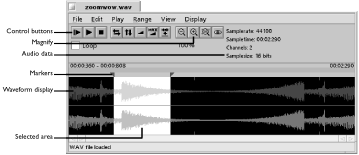
Bending the Waves Another very powerful element is the WaveShaper, which you can drop in between any two points in a network and use to take complete control over the waveform of the signal running through that node. Double-click on a WaveShaper element in an existing network and grab any point on the waveform in the resulting window. Drag it to another part of the window to deform the wave pattern visually, thereby altering its frequency or amplitude. Close the parameter window and play the network again to hear the results of your manipulations. Because the WaveShaper is excellent at giving you fine-grained control over sound forms, you'll probably want to reserve it for use in networks you've created that sound almost--but not quite--perfect. BamBamBeOS includes a number of tools that make it easy to record and play audio tracks, but nothing that will let you edit or customize existing recordings. Gertjan van Ratingen's BamBam is 100% free and gives you all the standard tools you need for basic editing of stereo audio files. If you've used stereo audio editors on other platforms, you'll find that BamBam operates in roughly the same way. Drag any .wav or .aiff audio file onto the BamBam icon (or into its application window) and it will be displayed graphically (see Figure 14.02). Press one of the play buttons at the left of the toolbar and the file will be played through the BeOS audio subsystem.
Audio Editing 101 In addition to standard cut, copy, and paste features, BamBam comes with a small collection of built-in audio-manipulation tools that you can use to alter the volume, direction, and channel placement of left and right audio tracks. Let's say you've got a file with several seconds of silence at the beginning of the track that you want to crop out. Start by making sure you have a clear view of the track's beginning section. If the track is longer than around 30 seconds, you'll probably want to zoom in for a closer look so you can see what you're doing more clearly. Click the magnifying glass icon on the toolbar once or twice to zoom in, then use the horizontal scrollbar to glide toward the beginning of the file. Select the area represented by the nearly flat waveform--this represents the silence at the track's beginning. When you click the Play button while a range is selected, only the selected range will be played. If the selection is too large or too small, you don't have to start your selection over; just drag the triangular marker just above the waveform to the left or right until you've got it right, then tap Alt+X to remove the selected area.
When you're ready to get a little more experimental, try copying and pasting selected data from one section of the file into another, just as you would do with a text editor. Hit Play again, and dig on your new gig as an audio collage artist. Of course, you can also copy and paste selected ranges from one file to another.
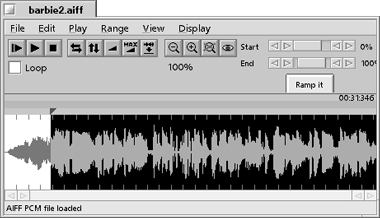
Number Nine, Number Nine ... One of the easiest ways to get wild effects with BamBam is to reverse the direction of a selected range. Select an arbitrary range within your file and pull down Range | Reverse (or click the horizontal arrows icon on BamBam's toolbar). Press Play again and you'll find that the file plays forward, then backward for a few seconds, and then forward again--quite a trip. For an interesting symmetrical looping effect, try this: Starting with a brief (several seconds) source file, select the entire waveform, copy it to the clipboard, then reverse it. The version on the system clipboard will be stored in the normal direction, while the version in the BamBam Edit window will be backwards. Now, click your cursor at the very start of the file and paste from the clipboard. Select all, click the Loop checkbox, and click Play. The file will play forward, backward, forward, backward, and so on in an endless loop. If your surreal creation has a good beat (and just about any sound takes on a good beat when tweaked this way), dance to it. Ramp It You can create very professional-sounding fade-ins and fade-outs by using BamBam's "ramp" feature. If a file begins very suddenly and you'd like its volume to grow gradually from zero to full, select a few seconds at the beginning of your file, click the ramp icon (the triangular wedge on the toolbar), and a pair of sliders marked Start and End will appear at the upper right of the BamBam interface. Slide the Start control to 0% and leave the End control at 100%, then click the Ramp It button. BamBam will create an even fade from silence to full volume, covering the selected area. Deselect and click Play again to hear your fade. You can, of course, use values other than 0% and 100%, and can even amplify the signal all the way up to 200% if necessary. By the way, you can control signal amplification for the entire file in this way. If your file is too quiet, for example, select the entire file (Alt+A is the easiest way to do this), click the ramp icon, and use the sliders to change volume over the entire range from 100% to, say, 150%.
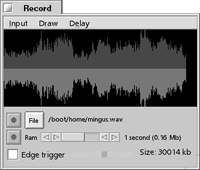
Recording All of that is well and good for working with preexisting audio files, but BamBam is also an excellent tool for recording new audio files, whether from microphone, an incoming audio line from your stereo or VCR, your computer's CD player, or an external digital-to-analog converter. BamBam can record to a file on hard disk or directly into system RAM.
|
||||||||||||||||||||||||||
 |
Please direct technical questions about this site to webmaster@peachpit.com.
Copyright © 1999 Peachpit Press and the respective authors.


