New and Updated Preferences
- Notes on New and Updated Preferences
- Devices
- Dial-Up Networking
- Dial-On Demand
- Adding Custom Modem Initialization Strings
- From Location
- Media
- Real-Time Audio
- Real-Time Video
- Mouse
- Printers
- Screen Saver
Notes on New and Updated Preferences
BeOS R4.5 supports more hardware, makes it easier to get online, and offers
more choices for power users. Many of these changes manifest themselves in
the collection of Preferences panels preinstalled on your system.
Devices
As before, the Devices preferences panel can be used to reserve hardware
resources for devices that, for one reason or another, can't be
automatically configured by the operating system at boot time (see The
BeOS Bible for full details). The most common use of the Devices panel
is to allocate an IRQ for certain modems; in fact, you'll find a new menu
entry devoted just to modems which lets you easily establish resources on
serial port 3 or 4. After using this panel, jump down to the entry you've
just created and take a look at the bottom of the panel. If you see a
warning about IRQ conflicts, check to make sure the IRQ referenced is the
same as the IRQ to which you've jumpered your modem. Remember: You may have
to disable a COM port on your motherboard to make sure it isn't stealing
the resources you need for the modem! Detailed instructions on modem
configuration can be found in The BeOS Bible. You may also want to
see this Web
page devoted to the topic.
In R4.5, the Devices panel is much more functional than in R4. For
starters, you can now view a list of all resources in use by pulling down
Devices | Resource Usage. And whereas you were able to change resources
only for a few select devices in R4, in R4.5 you can alter IRQs, DMAs, I/O
ranges, and memory ranges for virtually any device in your system.

The Devices preferences panel in R4.5 is much more functional than in R4.
Specifically, it lets you alter resources for any installed hardware, and
lets you see at a glance the list of all resources currently in use. Click thumbnail for full-size view.
Warning: The same warning applies as before: If it ain't broke,
don't fix it. Use the Devices preferences panel only if you have supported
hardware with an installed driver that still isn't working for some reason.
Tweaking resources for working hardware "just to see what happens" can get
you into a jam quickly.
Dial-Up Networking
Dial-up services in R4.5 gain a couple of new goodies.
Dial-on-Demand
Perhaps most importantly, dial-on-demand services have returned, which
means you don't have to initiate a connection manually before attempting to
check your mail or a Web page. To enable dial-on-demand, look for the
Autodial checkbox in the DUN preferences panel. If this is not checked,
you'll still have to initiate connections manually. If you have more than
one POP entered and choose among them from the DUN Replicant in the
Deskbar, the POP you've selected as the default will be the one the system
dials when you click a URL, send out a ping, or check your mail.

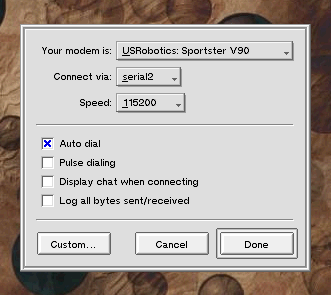
Check the Autodial checkbox in the DUN preferences panel to enable
auto-dial features for your modem.
Adding Custom Modem Initialization Strings
In BeOS R4 and prior, adding a custom initialization string entailed
editing /boot/beos/etc/modems.ppp. Since this is a system-level
file, having to do so was technically a bug in the operating system, since
users should never have to touch system-level files. In R4.5, this
situation is rectified with the addition of a new dialog to the DUN panel.
If your modem doesn't appear in the DUN modems picklist, click the Custom
button and give your modem a name (the manufacturer and model would be a
good choice). From here, there are two ways to proceed. If you already know
your modem's initialization string (e.g., you've got the modem's
documentation or you've found the manufacturer's Web site), you can simply
type or paste it into the dialog and click OK. You may want to search
through the massive database of init strings at http://www.modemhelp.org/.

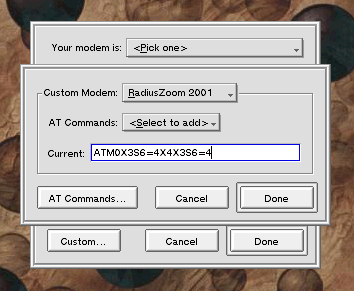
R4.5 includes a new Custom Modem panel that will let you add a modem init
string to your system without editing modems.ppp.
If you can't find the init string for you modem, you can try and build a
string from scratch. Some of the most basic modem commands are accessible
from the new AT commands picklist, and Be provides advanced documentation
that you can access by clicking the AT Commands... button.
Note: New modems are not added to the modems.ppp file, but
are stored in configuration files living in the
~/config/settings/DUN hierarchy.
From Location
Finally, R4.5 adds a "location" selector similar to that found in other
popular operating systems. This addition is primarily to support laptop
users, who may find themselves dialing out from multiple locations (such as
work, home, and from wireless modems).
The Location picklist functions just like the Connect to picklist, and lets
you select from among built-in options or build custom connectors. For each
location selected, you can enable call waiting and dial-out prefixes, and
you can select dial prefixes for each independently.
Tip: If you later migrate from PPP to a cable, DSL, or other fixed
network connectivity solution, you may want to remove the DUN Replicant
from the Deskbar. To do this, just remove all listed connections from the
DUN panel and restart the Deskbar (or restart your machine).
Media
In R4.5, the Audio and Video preferences panels have vanished and are
replaced by the new, unified Media preferences panel.

All audio and video preferences are now configured through a unified Media
preferences panel, rather than through separate audio and video panels. Click thumbnail for full-size view.
In essence, not much has changed here functionally; you've just got a
nicer, more logically integrated control point. There are, however, a few
noteworthy differences.
Real-Time Video
When you select the main Video or Audio Settings option in the left side of
the panel, you'll find a box from which you can select "Enable real-time
video." Check this box and click the Restart Media Services button to get
the absolute maximum video performance, with the absolute lowest possible
latencies. This is achieved by buffering larger amounts of video data into
system RAM. As you might expect, this is RAM that might otherwise be used
for other tasks, so this option is really only for hardcore video fans
(errr.... that didn't come out quite right, but you know what I mean).
Real-Time Audio
It's exactly the same as the real-time setting for video, decribed above.
Again, use this option only if your audio needs are very intense and you
don't need to use your machine for general computing tasks at the same
time. For example, you may want to devote a BeOS machine to 64-track mixing
of real-time incoming audio signal as your band lays down tracks for its
next album. You should probably not check this box if you just want to hear
the sound effects in Quake better. It won't make any difference, and you'll
probably get worse overall Quake performance, because game programmers will
have already optimised their games; you'll be second-guessing something
they've already improved via intensive testing.
Tech note: When real-time audio or video is enabled, any media
add-on that deals with audio processing has its buffers "locked" and thus
guaranteed not to be swapped out to disk. Audio buffer size is also
reduced, depending on the speed of the hardware. For example, with a PCI
sound card on a 500-MHz PIII, the buffer size will be around 3
milliseconds. For slower machines or ISA cards, it will be higher. Without
this option enabled, audio buffer sizes (and therefore latency) will be
fixed at around 24 milliseconds. BeOS also locks the libmedia binary into
memory when real-time media is enabled. Note that latency will be larger
than buffer size by a specific factor because of the way audio is processed
(i.e., it's double-buffered). In any case, thanks to the real-time options,
audio and video signals can flow freely through the system even if the
machine is heavily taxed, and even if it's currently thrashing virtual
memory.
You should enable real-time audio or video services if you have a limited
amount of memory in your system and are noticing less-than-perfect playback
or recording. Users of low-grade sound and video cards may also benefit by
enabling these options, as will audio and video professionals in almost all
situations. Remember that enabling real-time audio and video will take away
from the total amount of memory available to your other applications,
possibly causing them to page memory out to disk sooner than they otherwise
might. If you're not experiencing any audio or video glitching, there's no
need to select this option.
Tip: If you select the "Show volume control in Deskbar" option, a
Media Replicant will appear in the Deskbar shelf alongside your other
Replicants. You can use this in several ways. Left-click, and a volume
slider will appear, letting you control the master volume for the line-out
jack on your sound card, without having to launch the Media preferences
panel first (and a damn handsome slider it is, too). Right-click the
Replicant, and you'll get a context menu which lets launch MediaPlayer or
the Media or Sounds preferences panels.
Mouse
The Mouse preferences panel has grown a couple of new options under the
"Focus follows mouse" picklist. "Focus follows mouse" is described in
The BeOS Bible, but "Warping" and "Instant Warping" are new. Enable
either of the warping options, and you probably won't notice a difference
right off the bat. But open a bunch of applications and use the Twitcher
(described in The BeOS Bible) to toggle among them, and you'll see
what warping is all about.
When you switch to a new application from the keyboard, the mouse cursor
will move itself into position over the newly selected app or window. With
normal warping selected, the cursor will "glide" into position. With
Instant Warping selected, the cursor will snap into position. Another great
way to see the effect of warping is to minimize a window and then restore
it from the Deskbar. The mouse cursor will glide from the Deskbar to the
restored window.
While the Printer preferences panel itself has not changed in R4.5, some of
the capabilities in the print layer have. The entire class of Epson Stylus
printers is now supported, and you can print to printers attached to serial
and USB ports. You'll find these options in the Add Local Printer and Add
Network Printer panels.
In addition, you can now print to network printers via Windows networking (CIFS/SMB). CIFS is
described in detail in the Experimental section of this site.
Screen Saver is basically identical to the version described in The BeOS
Bible, but now it has two new options on the Fade tab: "Turn off
screen" and "Password lock." These should be pretty self-explanatory, and
they function just as they do in other operating systems.
Note, however, that certain of the BeOS video drivers (specifically, the
Riva128 driver) do not support DPMS, and thus cannot power down your
monitor as they should. Be is looking into the hardware issues surrounding
this. According to one of Be's graphics engineers, "activating a DPMS power
saving mode can cause the video memory refresh to stop, causing the display
image to slowly fade away as the video RAM loses its contents." If this
option does not work with your video card, you might want to simply choose
the "Blackness" saver module instead and look for an update in a future
version of the operating system.
|