BeOS Bible Updates

New and Updated Applications

Application Notes
Camera
CDPlayer
CodyCam
Deskbar
MediaPlayer
Selecting Media Lengths
Command-Line Options
SoftwareValet
SoundRecorder
Team Monitor
TV
Zip-o-Matic

Application Notes

The bulk of the new applications distributed with R4.5 are (big surprise) media-oriented. Most of them are quite intuitive to use and need little documentation -- which is good, since they don't come with any. Here are some notes and tips on using applications included with BeOS that are not covered in the print edition of The BeOS Bible.

Camera

Everybody and his brother is picking up one of those newfangled digital cameras these days, which is no surprise, considering their high convenience factor and ever-increasing quality (though we're still a long way off from getting high-quality photos for anything less than several thousand dollars). While the software that comes with these cameras generally runs only under Microsoft Windows or Apple's Mac OS, BeOS includes a utility that will let you extract your digital images to your hard drive, assuming you have one of these models:

Nikon Coolpix 900
Olympus D320-L
Olympus D340-L
Olympus Camedia C-400
Olympus Camedia C-340-L, C-840-L
Polaroid PDC640

More models will almost certainly be supported in the future. Usage is pretty straightforward. Jack your camera into a spare serial port, launch Camera, and select the appropriate port and port speed (usually 115K baud). If you prefer (or don't know), click Autoprobe and Camera will try to determine the best settings for you. When ready, click Connect and Camera will read images stored in the camera's memory into the Pictures preview window. You'll probably want to resize or maximize the panel so you can see the thumbnails clearly.

Select the images you want to save (or click Select All) and click Save. Select a folder on your BeOS system for image storage, and down they come. Alternatively, you can drag images directly from the preview window into the Tracker. You can, of course, click Delete to remove images from the camera's memory without saving them first.

Because images are stored internally in JPEG format in most digital cameras, the images will be stored as JPEG images on your system as well. Hopefully a future version of Camera will be capable of using the Translation kit to let you save out your images in any format for which a Translator is installed.

CDPlayer

If you have more than one CD-ROM drive in your machine (maybe one of them is a CD-R device), try right-clicking in CDPlayer's interface to select between them. You can even launch a new instance of the player from here, so now you can have CDs playing in both drives.

CodyCam

If you've been following BeOS online, you've no doubt run into the inimitable
CodyCam once or twice. But rather than a simple Web page trained on the secret inner workings of Be, Inc., CodyCam is now an app included with every copy of BeOS. That means you can set up your own Web cam and broadcast a picture of the inside of your office, workstation, dining room, coffeemaker, or the view from your apartment's rooftop every few seconds. Now how cool is that?

As with the TV app, CodyCam can work with any video signal coming through a supported video-capture card, such as the ever-popular Brooktree bt848, bt878, and 879 series chip sets (commonly found on the Hauppauge WinTV and other popular cards). This means that, unfortunately, the current implementation of CodyCam will not work with the cheapo "tennis ball" cameras that connect to a USB or parallel port. However, some tennis ball cams do come with s-video or composite outputs. If you can find one of these you should be able to work with it in BeOS. In all cases, you should be able to hoover video signal from a standard video camera, VCR, or television output and into the input jack on your capture card.

Note to high-end users: At this writing, we have word that an independent developer is working on a driver for the excellent miro DC30 video-capture board. No release date has been set, but stay tuned to BeWare and the usual BeOS news sources for details.
Once you've got that ironed out, usage is pretty straightforward. Juggle the Video preferences panel to pick up the signal from the correct input channel, then establish a filename, output format for captured images, and time interval. Finally, enter the address, username, password, and path to a directory on an FTP server somewhere.
Tip: If you set up FTP services in the BeOS Network preferences panel, you can send the captured images to your own machine (though it would be nice if CodyCam would just let us save files directly to disk rather than requiring that they be sent to an FTP server).
I tested CodyCam at the recent BeOS Bible release party, and it worked flawlessly. Unfortunately, the 16-year-old cameraman I handed the camera to didn't succeed in capturing much of anything besides blurry shots of the undersides of beer cups. However, he did manage to grab a few good shots of my father and I eating Twinkie Dogs in support of the Be cause. You can view a screenshot of the event here.

The biggest problem with the current version of CodyCam is that it provides no mechanism for saving previous images -- it would be nice if it could add timestamps to the filenames so that each new image wouldn't overwrite the existing one. But not to worry -- that's what shell scripts are for. I wrote the following script for those cases in which you want to store a whole directory of image grabs, all unique. Help yourself, and season to taste (usage of the shell is covered in Chapter 6, and scripting is covered by Chris Herborth in an online-only chapter here at beosbible.com).

#!/bin/sh
# Simple script to move codycam.jpg to a timestamped,
# unique filename every few seconds. Save this script as
# /boot/home/config/bin/imagekeeper, then run imagekeeper
# in the background while CodyCam is running.
# Specify the directory where codycam output is dumped

BaseDir=/boot/home/public_html/codycam

# Create a function to do all the work
rotate()
{
        datestamp=$(date +%s)
        echo $datestamp
        mv $BaseDir/codycam.jpg $BaseDir/$datestamp.jpg

        # Next two lines are important if you're serving your
        # files from a BeOS web server that cares about proper
        # MIME types and permissions.
        chmod 644 $BaseDir/$datestamp.jpg
        settype -t image/jpeg $BaseDir/$datestamp.jpg

}

# Set up an endless loop
while :
        # Call the function above
        do rotate

        # Adjust sleep length to equal the codycam capture interval
        sleep 15
done

Deskbar

While the only visible change to the Deskbar in R4.5 is Be's new corporate mark (logo), some of the Deskbar code has been rewritten "behind the scenes," making it easier for developers to take advantage of the Deskbar's Replicant shelf (a.k.a. "status view"). This means you may encounter an increasing number of applications that install small tools or interfaces into the shelf for convenience.

As an end user, you also get a certain amount of additional control over what gets placed in the Deskbar, thanks to a new utility Be engineer Jon Wätte threw into the system at the last minute, called "desklink." It's simple to use:

desklink /boot/beos/apps/NetPositive
will put a small NetPositive Replicant into the Deskbar's status view. To remove it, use:
desklink remove=/boot/beos/apps/NetPositive
Of course, you can substitute the path to any application on your system. But it gets even cooler than that, because you can also pass in arguments to tell the Replicant exactly what to do when right-clicked. For example:
desklink "cmd=Open TipServer:/boot/beos/apps/NetPositive
http://www.betips.net/ &" /boot/beos/apps/NetPositive
Now a left-click will launch a fresh NetPositive window, while a right-click will give you a context menu asking whether you want to "Open NetPositive" or "Open TipServer." Cool, huh? Remember to include that ampersand; if you leave it out, the Deskbar might become temporarily unresponsive. The desklink command doesn't have to point to applications, either -- it can point to any file or folder on your system. Now all you have to do is add a few desklink commands to your UserBootScript to automatically populate the Deskbar with custom Replicants at boot time.

If you prefer to do this graphically, download Wätte's HotLink utility from BeWare, but remember that you can't use the graphical version to automate the creation of Replicants at boot time.

MediaPlayer

Long missing from this media-optimized operating system has been a simple media player: a default application for handling audio and video files. R4.5's MediaPlayer is capable of handling any movie or audio file for which a codec is installed (see "Under the Hood" for details on codecs). MediaPlayer also takes over NetPositive's old job of handling movie file playback.

mediaplayer

MediaPlayer is capable of handling any audio or video file for which a codec is installed.

While MediaPlayer is associated with all audio and video files by default on a fresh BeOS installation, you can choose to associate other applications with media files using the FileTypes preferences panel (Chapter 10).

Aside from the VCR-style controls, MediaPlayer has a few less obvious tricks up its sleeve. Use the small vertical "knob" at MediaPlayer's right to display additional controls, including a volume slider and an application menu bar. Set your media to repeat itself endlessly by selecting Settings | Loop. If you don't want media files to start playing immediately upon download or launch, use the Settings | Preferences panel to disable this option. You can also use this panel to establish defaults for media looping and volumes. Use the View menu to snap quickly between various movie magnifications (hotkeys are provided for common magnifications). Get details on the codec currently in use and other file details from the File | Info panel.

Tip: If you want to find out whether Be has released additional codecs since you installed the OS, pull down File | Download New Media Add-Ons. This will take you to a special page at be.com. If any new codecs have become available, you'll be able to upgrade your system on the fly.

Selecting Media Lengths

If you want to play just a portion of an audio or video file, look for the semicircular draggers at the left and right of the progress indicator. Slide them left and right to delimit playback to just that area. This UI 
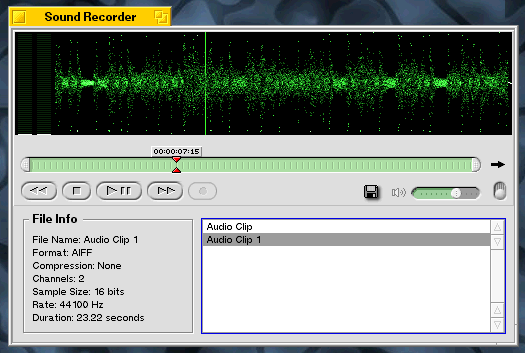
convention is now standard in several BeOS media applications (see also
SoundRecorder).

mediaselect

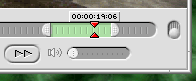
Drag the semicircular draggers left and right to play back only a portion of any movie or audio file.
Note: Now that MediaPlayer handles all audio files by default, the puny little PlaySound application has been removed from the operating system. Good riddance.

Command-Line Options

If you launch the MediaPlayer from a Terminal with the --help option, you'll discover that you can control a whole bunch of parameters from the command line. You can specify the volume of the audio, the three different display modes, whether or not to loop, etc. The parameters passed from the command line will override any attributes stored in the movie or sound file by MediaPlayer the last time the file was played.

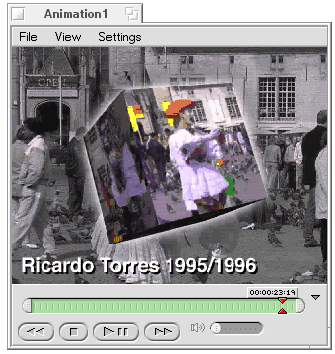
Note that you can even specify the location in the file from which to start playing -- something you can't control when launching a movie or sound by double-clicking in the Tracker. For example, the following command will cause Animation1 to be launched full-screen and to loop endlessly through the first one second of video:

MediaPlayer -loop on -inpoint 0 -outpoint 1000000 -full Animation1
These options can come in especially handy for creating self-running demo scripts!

SoftwareValet

From the end user's perspective, SoftwareValet appears almost exactly as it did in R4. However, the Be team has put a significant amount of effort into beefing up the SoftwareValet system, and is (at this writing) revamping the BeDepot Web-based back end as well.

BeOS R4.5 uses a new version of the SoftwareValet .pkg format, which is incompatible with the version of SoftwareValet in R4. If you try to open a package file created under R4.5 with BeOS R4, you'll get nothing but a cryptic error message. Starting with the current version of SoftwareValet, forward-compatibility will be handled more elegantly, i.e., if another version of the package format is released and you try to open a package created on a version of the OS that's newer than the one you're running, you'll get a more useful/informative error message. Note that the version of SoftwareValet shipped with R4.5 is compatible with older package files.

The only behavioral difference you'll notice in the new version of SoftwareValet is that the large button bar isn't launched automatically every time you open a package file. Internally, there are many changes that will let developers create smoother install routines.

In addition, the "Manage" section of SoftwareValet, designed to let you keep track of installations and check for upgrades to your existing software, has been revamped internally. While this revamp will provide much more reliability and functionality in the future, for now, it means that the new SoftwareValet is incompatible with your old package database. Packages you installed under R4 may not be visible in the R4.5 version of SoftwareValet.

SoundRecorder

Playback is all well and good, but when you're feeling creative (and that's what BeOS is all about, right?), you need to be able to record your own tracks. SoundRecorder is a simple (but surprisingly capable) tool that does just what it sounds like it does -- grabs audio from any stream moving through the system, lets you make simple edits, and saves the result to disk for posterity or further processing. You can save files in any format for which a codec is installed.

soundrecorder

SoundRecorder lets you record, play back, and perform simple edits on common audio file formats. Multiple source files can be handled simultaneously. Also noteworthy is the unique, animated visualization technique SoundRecorder uses to display signal levels.

It's easy to use the VCR-style controls to play back and record audio, but you'll need to specify which of the system's multiple concurrent audio streams you want to record. This is not done through SoundRecorder's interface, but from the Source picklist on the Audio Input tab of the Media preferences panel. If you find yourself recording nothing but silence, check your preferences. If you want to record all audio signals running through the system rather than just a single stream, set the Audio Input picklist to "Speaker Out." Similarly, if you find that your source signal is too weak or too strong, use the Media preferences panel to adjust your levels.

Tip: If you check the "Show Volume Control on Deskbar" box at the bottom of the Audio Settings tab, you'll get a Media Replicant in the Deskbar that lets you control overall volume with a left-click, or access your Media preferences with a right-click.
You can also use SoundRecorder to tweak existing audio files. Click the Open knob at the lower right to display an info panel, and drag your audio clips into the file panel. Full details on that file are displayed to the left.

If you want to edit the current track, note that you can't select a portion of the signal display, as you might with other audio tools. Instead, look for the semicircular endpieces at the left and right of the green progress indicator. Drag these left and right to trim the beginning or end of your track. Once you've got it dialed in perfectly, drag the signal display into the Tracker or onto the Desktop to create a new file consisting of the selected area.

Tip: Just as with ShowImage, format translation can be accomplished "on the fly" -- just hold down the left Ctrl key as you drag your selection to the Desktop or Tracker.
While it won't blow minds, the presence of SoundRecorder in R4.5 shows that Be isn't just blowing smoke with its media claims -- the system really is equipped to do more with media "out of the box" than are other operating systems. And it's done with style: The signal display fades into existence when an audio track is loaded, like a starship coming out of warp. Way hip.

Team Monitor

You won't find Team Monitor in the Applications folder, because it isn't an application in the normal sense of the word. Rather, Team Monitor is a means of controlling your runaway threads, or more accurately, entire teams of threads. If an application -- either graphical or console-based -- gets out of control and you need to put it out of its misery, Team Monitor makes it easy.

While there have always been third-party applications that let you do this, and do it with more precision, it's great to have access to team-killing facilities built into the OS itself (and for you old timers, the Vulcan Death Grip still works).

teammonitor

Hit Ctrl-Alt-Del to see a list of all currently running teams. Click the Kill button to put a misbehaving application out of its misery.

Hit Ctrl-Alt-Del once, and all running teams will be listed. Application teams are listed in black, BeOS system teams are listed in blue, and misbehaving teams are listed in red. Select any team and click Kill to put a mischievous team out of its misery. Note that this tool only lets you kill entire teams, not individual threads. If you need that level of control, you might prefer a utility like Process Controller.

WARNING: Hitting Ctrl-Alt-Del more than once will invoke a hardware reset.

TV

Got BeOS installed at work? Then you'll love the ability to loaf off and watch TV in another workspace while the boss isn't looking. The TV application works with any supported TV tuner card, notably those containing the popular Brooktree bt848, bt878, and bt879 chip sets. The author has had good success with a standard Hauppauge WinTV board, available for less than $100.

Launching the TV app also launches the TV control panel, from which you can change channels; select the video input method; adjust brightness, saturation, contrast, and hue; establish a default size for the viewing window; and make other selections similar to those in the Media preferences panel. Note that you're not limited to viewing broadcast television stations; TV will let you view any incoming video signal, including that pouring out of camcorders, VCRs, and possibly other sources. If it plugs into the back of your TV card, the TV app will pick it up (though you may need to juggle some controls).

Depending on your area, you'll probably need to hook up an antenna to the jack on the back of your TV/capture card. Of course, you'll probably want sound to accompany your video. But sound from video-capture cards isn't delivered through the normal system bus, as it is with a sound card. Instead, you'll need to patch the audio-out jack on your TV card to the line-in jack on your sound card, then make the appropriate selection in the control panel.

Tip: Interestingly enough, the TV window will scale in real time as you resize its window, meaning you can severely distort the default viewing proportions. While interesting to play with, this is probably not how you want to see TV. To restore TV's proportions to something more reasonable, adjust the Default Image Size on the Options tab of the control panel, then close and restart the TV app.

Zip-o-Matic

Zip-o-Matic is both an application and a Tracker add-on. Living in /boot/beos/system/add-ons/Tracker, it appears on the Tracker's context menu and makes it a piece of cake to zip a file, a collection of files, or an entire directory structure. Right-click a file or folder, choose Zip-o-Matic, and a new zip file will appear at the same directory level. Astute readers will have noticed that the presence of Zip-o-Matic implies the assumed presence of zip itself. You win a cigar; users no longer have to download zip separately, as it's already present in /bin. However, the version of zip distributed with R4.5 is an old beta, since zip 2.3 hasn't yet been officially released yet. You might want to check
http://www.cdrom.com/pub/infozip/ for updates, as that's where the "real" zip 2.3 will be once it's released. The same notes apply for unzip updates.

zipomatic

Right-click any file or folder and choose Zip-o-Matic (or tap Ctrl-Alt-Z) to compress the heck out of it, preserving any folder hierarchies within.
Tip: Rather than using Zip-o-Matic as an add-on, try launching it like a normal app. Its window will hover, waiting for you to drop your payload into its interface.

Return to Table of Contents

Readers-Only Access
About BeOS | Online Chapters | Interviews | Updates

Please direct technical questions about this site to webmaster@peachpit.com.

Copyright © 1999 Peachpit Press and the respective authors.